@ekilah
a digital pensieve 🧙♂️
author: @ekilah
created_at: 2020-05-21
updated_at: 2020-05-25
Upgrading to Soft-Close Drawers
Before we even closed on the house we bought last year, my wife and I knew there were several projects we would want to get started ASAP. A few rooms desperately needed a new paint job, some drywall needed repair, some light fixtures needed refreshing… the list hasn’t stopped growing since we got the keys. Though neither of us had much experience doing these things growing up, we were mostly comfortable with the projects we were assigning ourselves, because our parents and YouTube could fill most of our knowledge gaps.
However, when my wife mentioned she would like soft-close drawers in our otherwise fairly-up-to-date kitchen, I had very little intuition about the project’s requirements, and after having (finally) finished the project, I now know there are a couple of gotchas along the way. By no means did my implementation come out perfect, but I learned some things and saved some money! Hopefully, sharing my experience can save someone out there some trouble (and money).
See what you’re working with
The first step to most projects - figure out what you’ve already got.
In my case, I had 11 kitchen drawers of varying width, each 22” deep, and all begging for some sweet, sweet, soft-close action. The existing drawer slides (the rails that the drawer sits/slides on) were a common builder-grade variety - metal rails with plastic wheels, not soft- or self-closing.
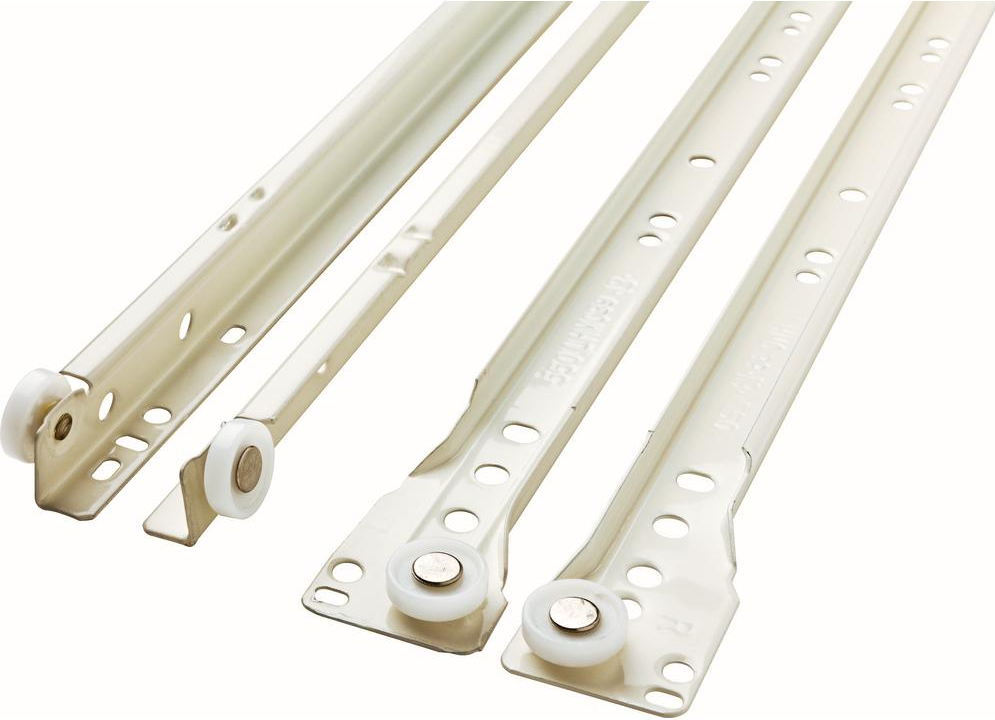 Ye old rails
The cabinets in my kitchen are “face frame” cabinets, which means there is a thin “frame” on the front of the cabinet that:
- hides the mechanical bits
- provides mounting points for the mechanical bits
- provides some structure for the front of the countertop
 Face frame cabinets
Importantly (more on this later), the gaps in the face frame (i.e. the length of the “Mid-rail” in the picture above) all seemed to be about 1” wider than the width of the drawers.
Do some research
For projects like this, I usually go watch several YouTube videos to just get used to the lingo, see some of the common problems and their solutions, make sure I have the tools I’ll need, etc.
Though I watched several, this video was the one I found most helpful.
This video, and other videos / blogs / product descriptions all helped me grasp the task at hand, and I gathered some tips and tricks for things like how to align the drawers and drawer slides, leveling, etc. Of course, my situation would prove slightly different than these examples though…
Shop around
This step was a bit tough. I am far from a contractor, so I don’t know where to buy “good” supplies for a project like this, or what brands are trustworthy. My default big-box store didn’t seem to have much inventory in this department, so I had to get out of my comfort zone!
I Googled around a bit, and ended up with the “Knape and Vogt 8450 Series” 22” drawer slides. I can’t say too many interesting things re: how I went about choosing these particular drawer slides; these seemed to have decent reviews, and the price wasn’t bad. I knew I wanted some that:
- were rated for a decent amount of weight
- these can handle 100lbs per drawer, which is more I’ll need
- could fully extend from the cabinet
- so I can see the contents of the back of the drawer easily
| Item (sold in pairs) | Price (pair) | Qty | Price (all) |
|---|---|---|---|
| Drawer Slides (KV8450FM B22 ANO) | $19.92 | 11 | $219.12 |
| Rear Brackets (KV8403BBL) | $2.51 | 11 | $27.61 |
| Face Frame Brackets (KV8404) | $1.95 | 11 | $21.45 |
| $268.18 |
The brackets hold the drawer slides in the cabinet but are sold separately:
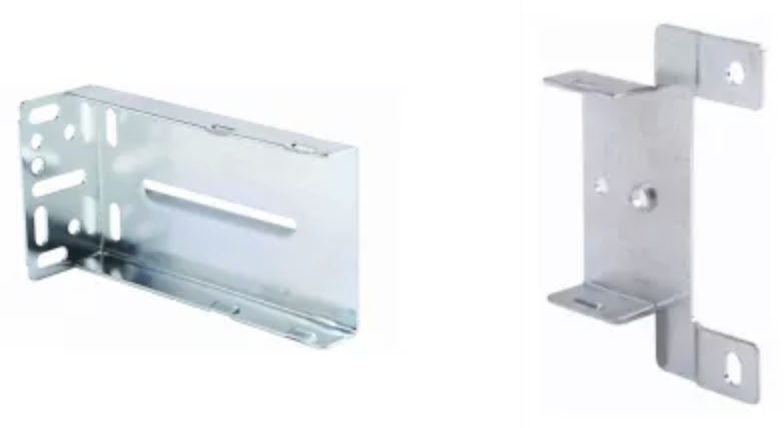 The rear and face frame brackets, respectively
I also noticed in some reviews that the screws were sold separately, but luckily the installation manual on the product page mentioned the size so I could order them at the local big box store (#7 x 1/2" pan head screws).
The instructions said I needed 20 screws per drawer, which was way more than I used - even if I hadn’t reused some of the screws from the old drawer slides (which I did), I used between 12 and 16 screws per drawer:
- 2 per face frame bracket
- 2-3 per back bracket
- 2-3 per drawer slide (mouting the slide to the drawer)
So, if anyone needs some screws… 😂
Plan it out
In my attempts to get the installation process right the first time, I probably spent a couple hours fiddling with the existing drawer slide mechanism, measuring every part of the cabinet and drawer, and planning out (read: overthinking) my attack. I thought & drew out several iterations of my plan until I came up with my final (?) plan:
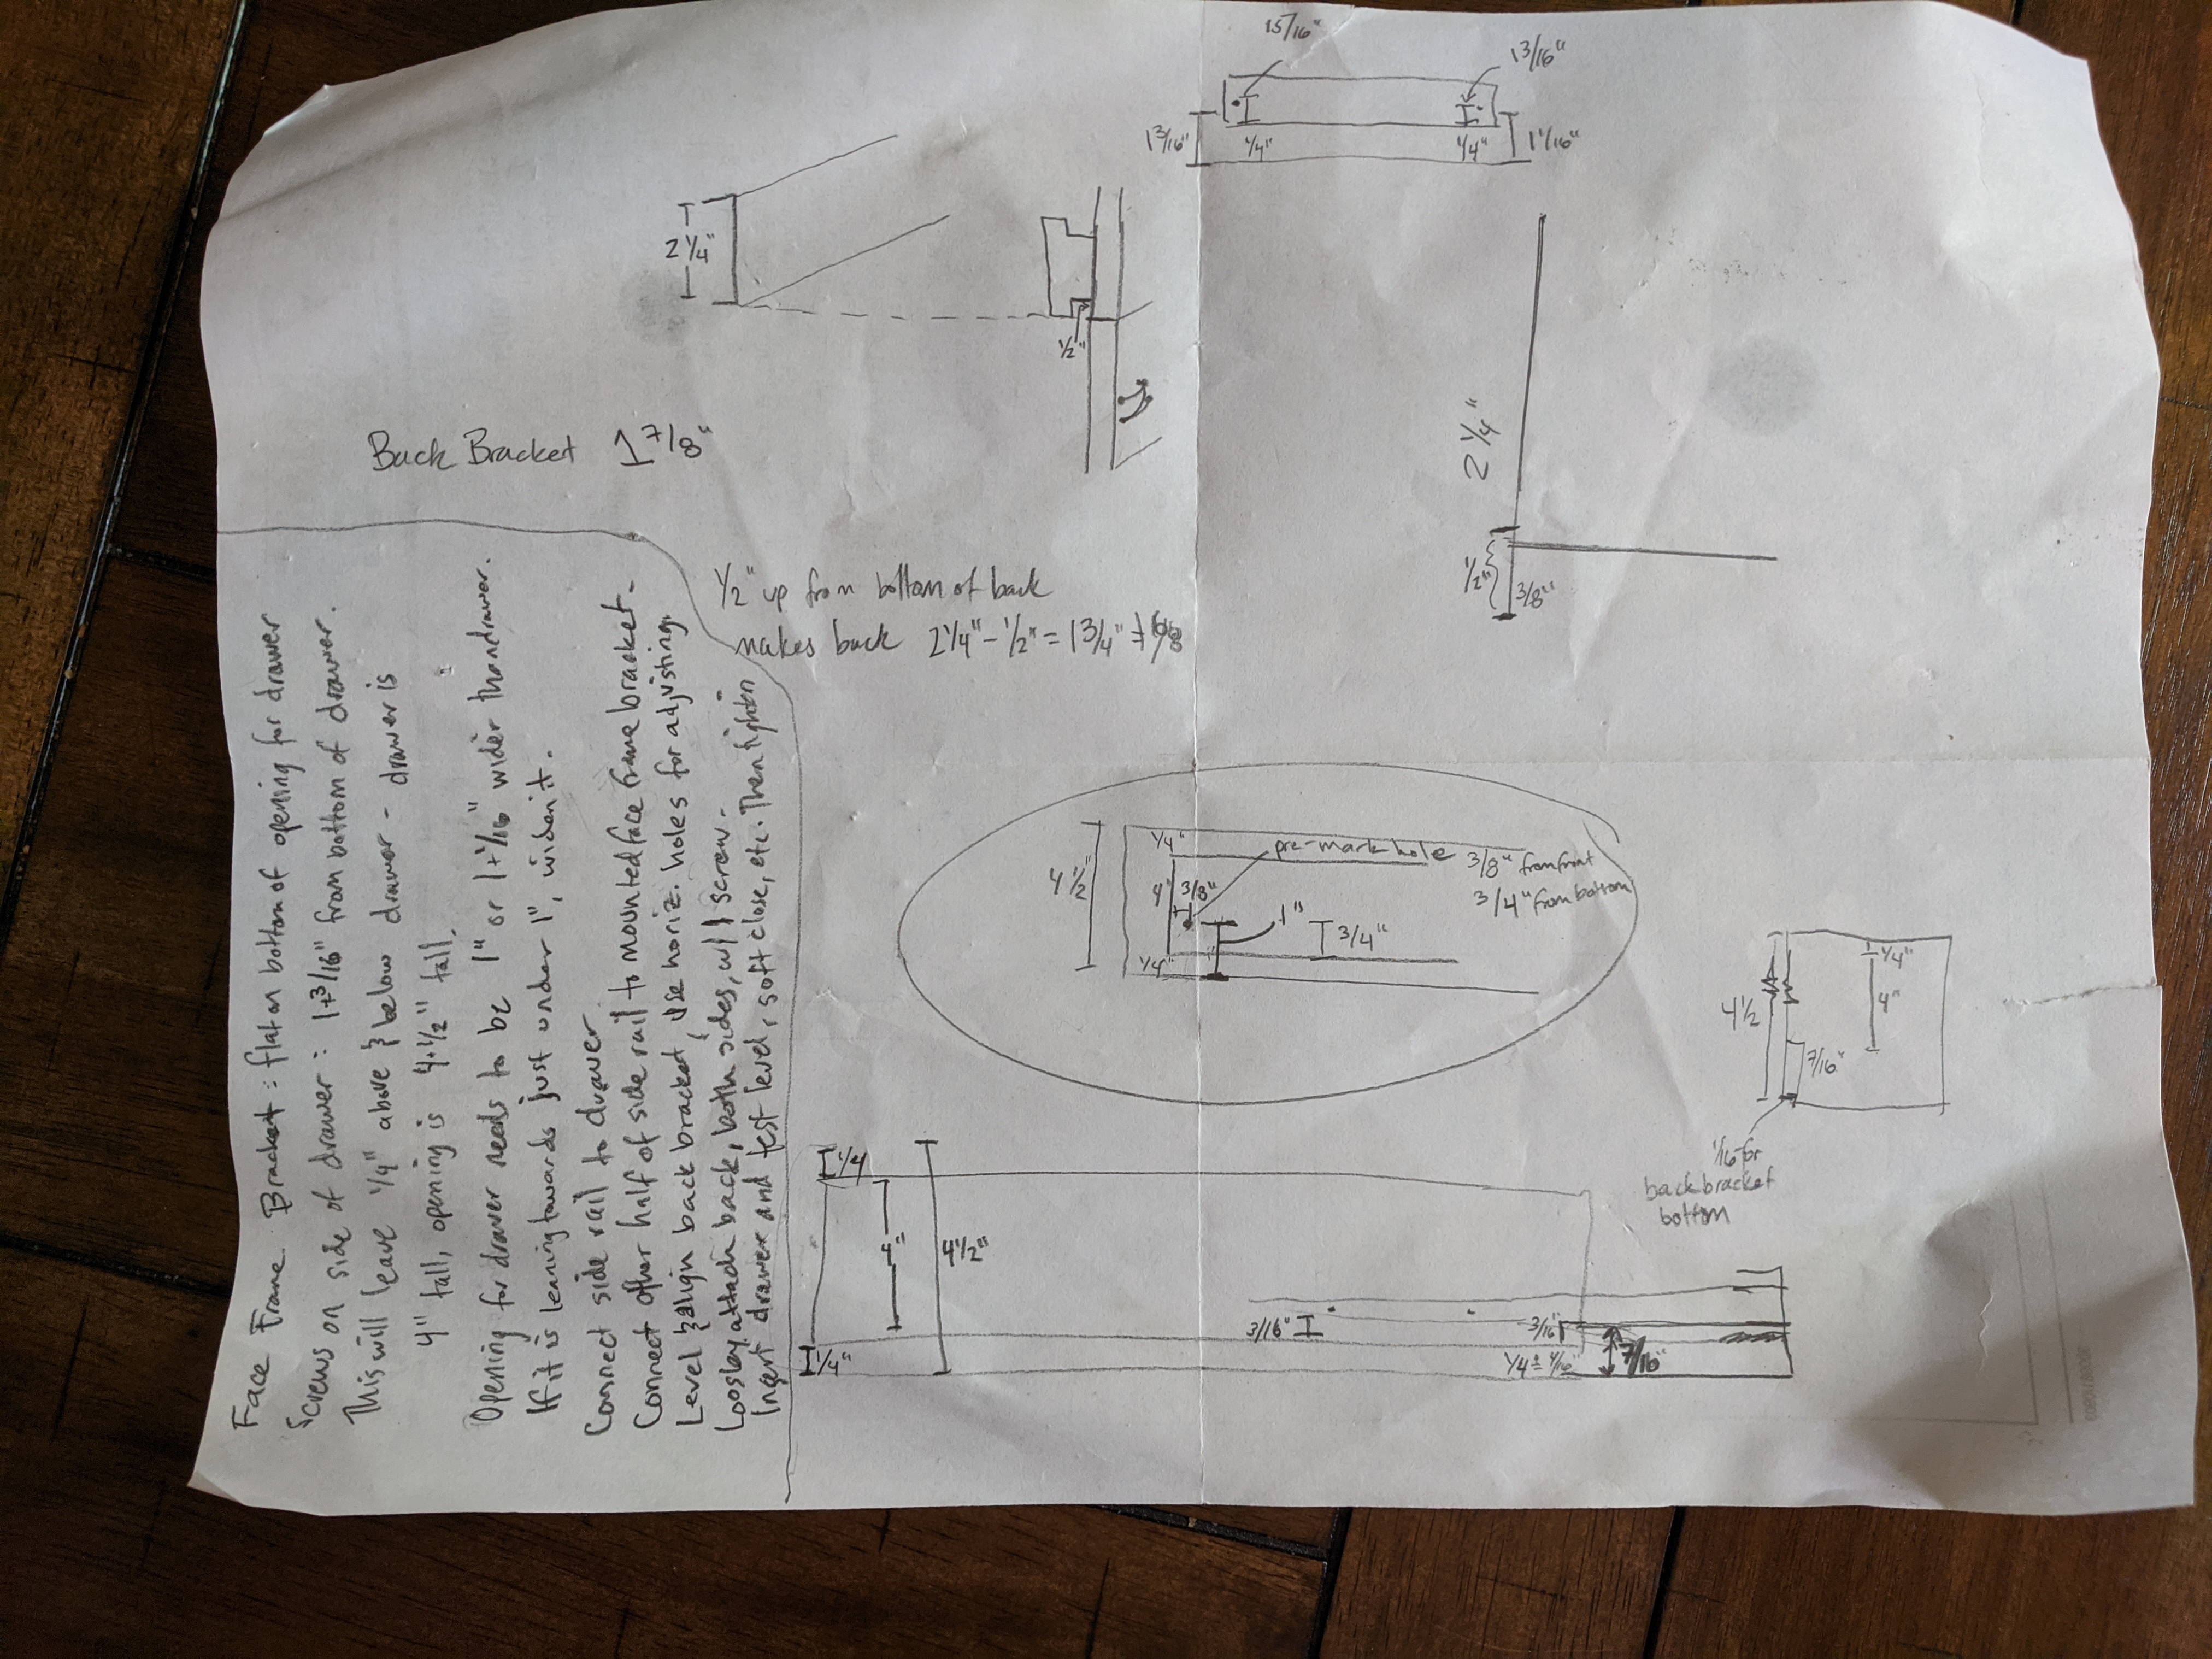 Yes, an actual pencil and paper were used in this project
Actually, I spread this project out over two weekends, one in the fall and one recently in the spring, so I had a few “final” plans.
In the fall, I decided to abandon the face frame brackets; I think I decided they complicated my math too much. There was a mounting hole that I was able to use to directly mount the drawer slide to the surface that the bracket would have mounted to, so I used it.
In hindsight (I ended up using the brackets in the spring, and redid a couple from the fall to use them):
- The bracket didn’t really complicate much math. The main complication: the shims I was mounting the back bracket to were not always tall enough to accomodate the extra height the front bracket added, but I was able to make things work.
- Using the bracket is nice, because you can remove the side rail from the cabinet simply by popping it out of the bracket, whereas w/o the front bracket, you have to unscrew the mounting screw to remove the slide.
Finally using the power tools
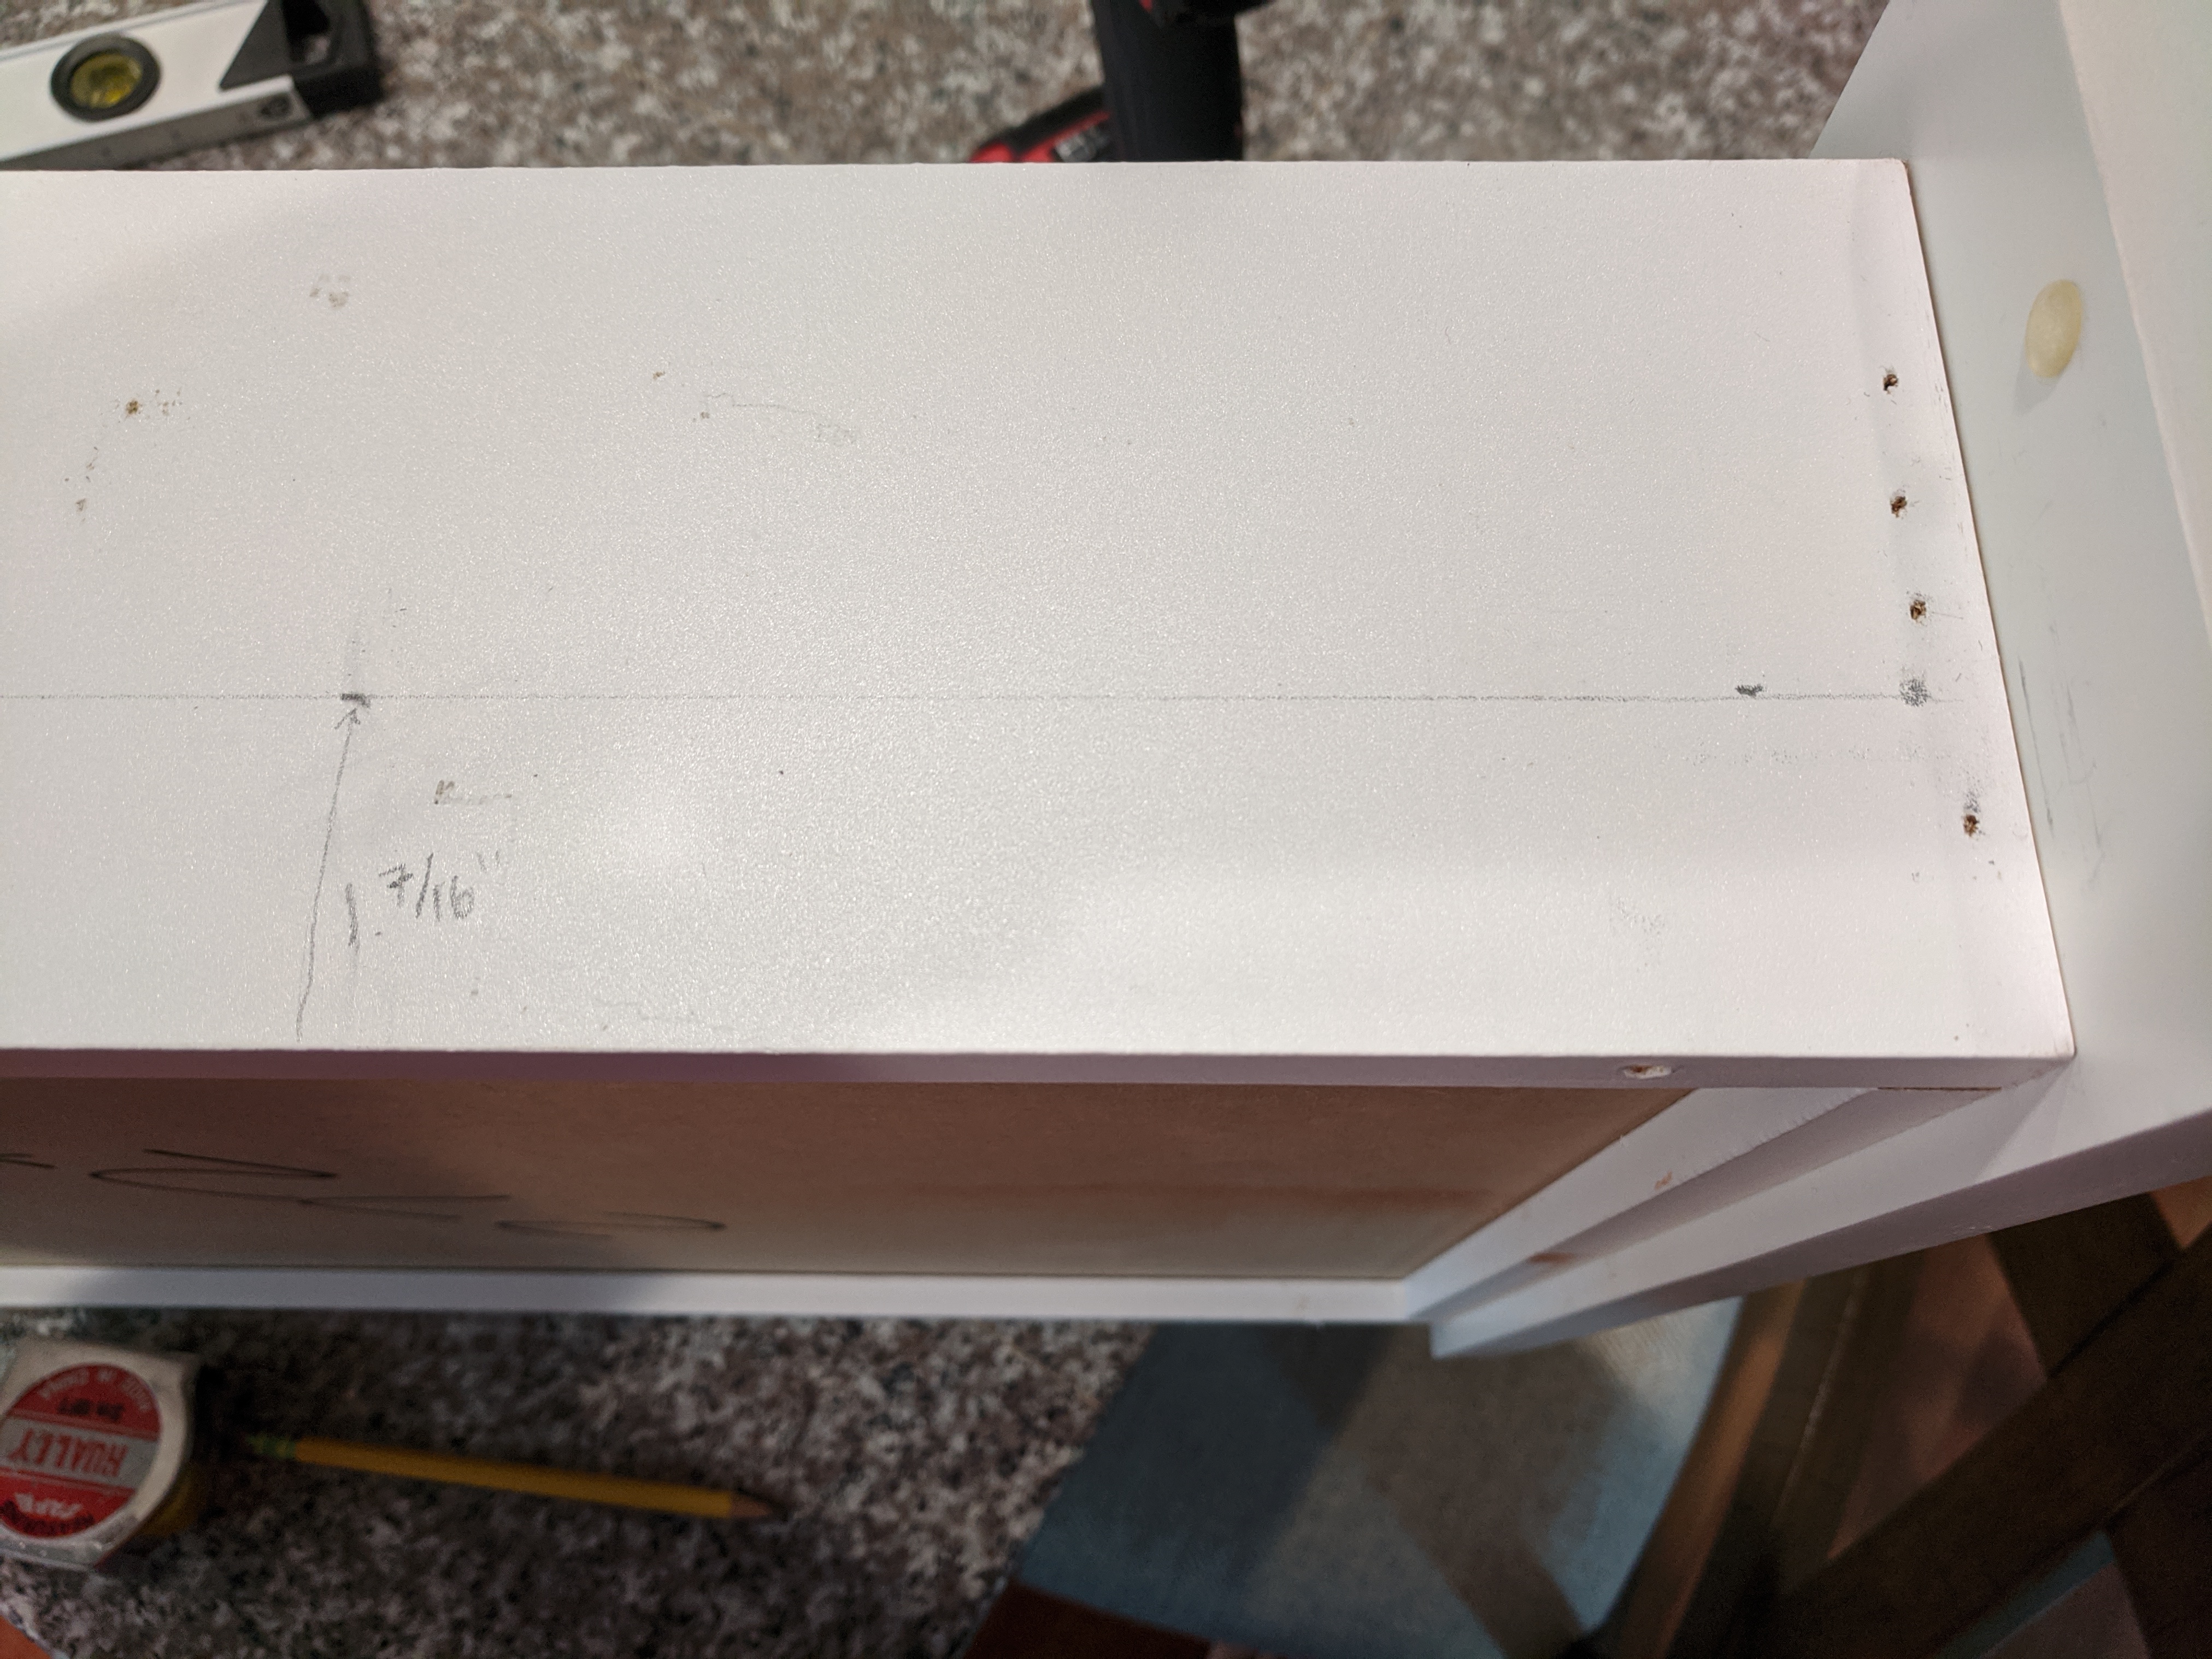
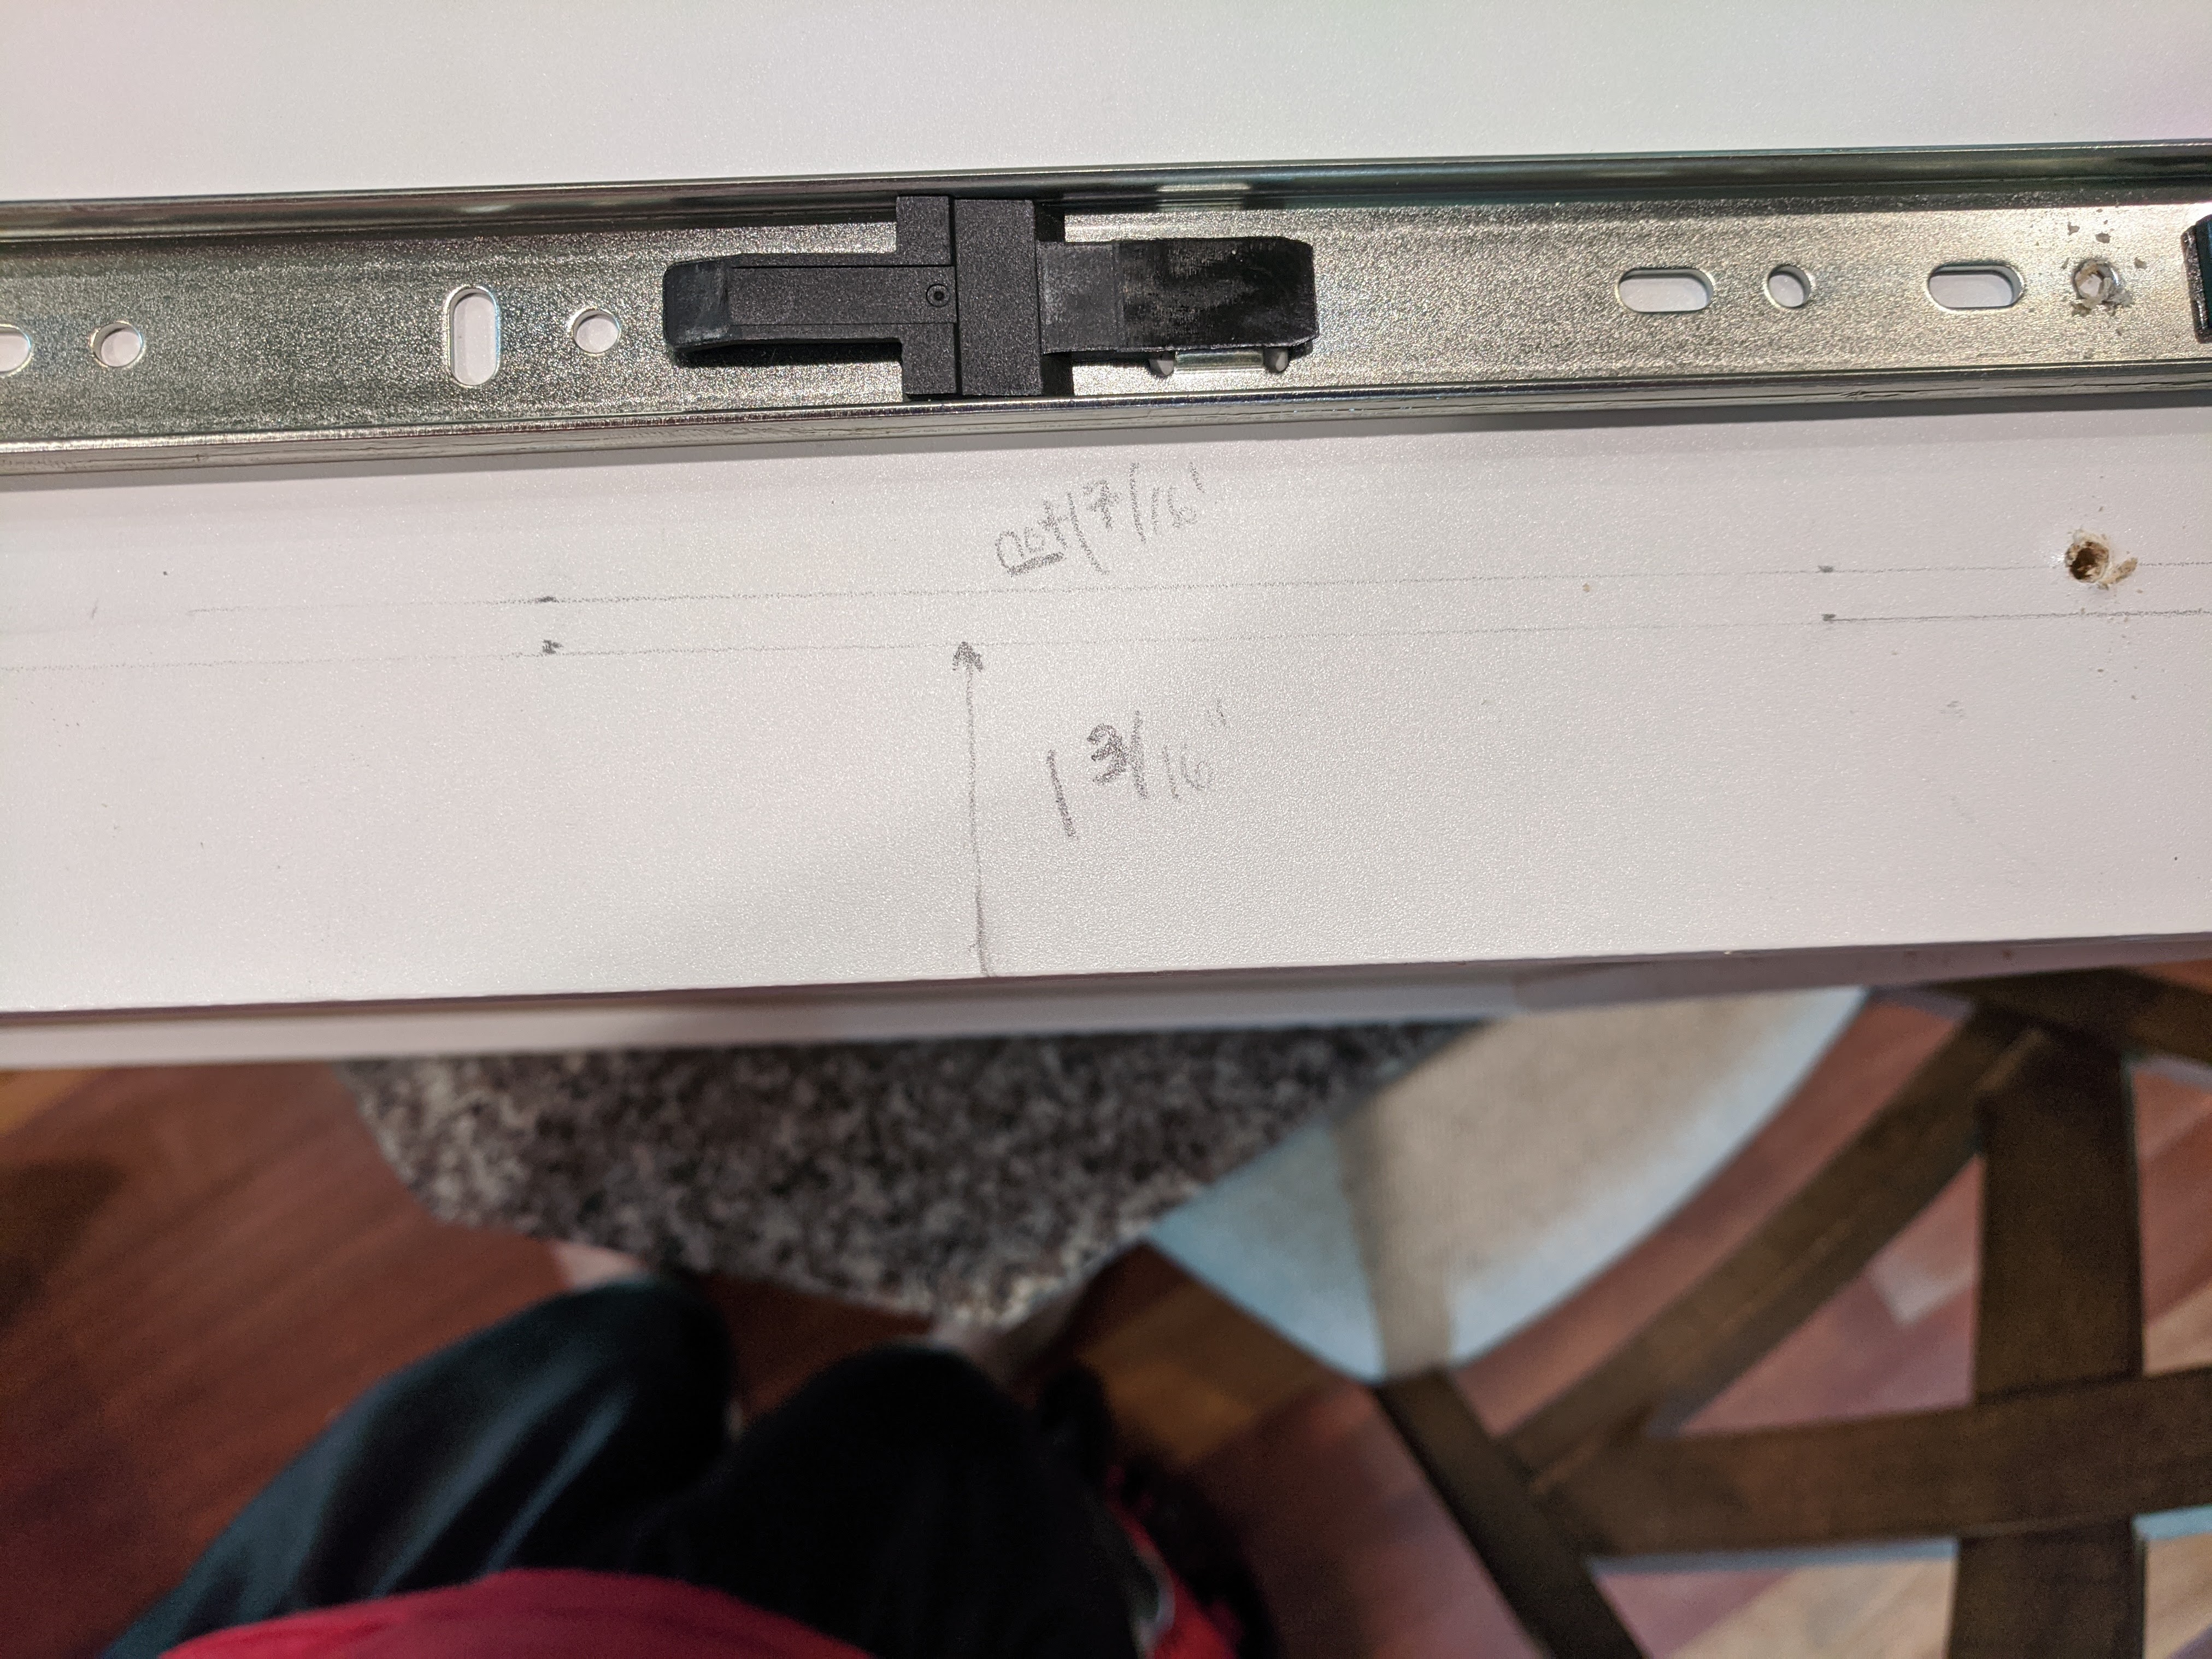
In the spring (when I’m writing this), I redid the math a few times (since I decided to use the front bracket this time), and decided that mounting the side rail 1-7/16" from the bottom of the drawer should center the drawer exactly 1/4" from the top and bottom of the face frame opening.
Step 1
Mount the drawer side of the slide onto the drawer, making sure to keep it very parallel to the bottom of the drawer.
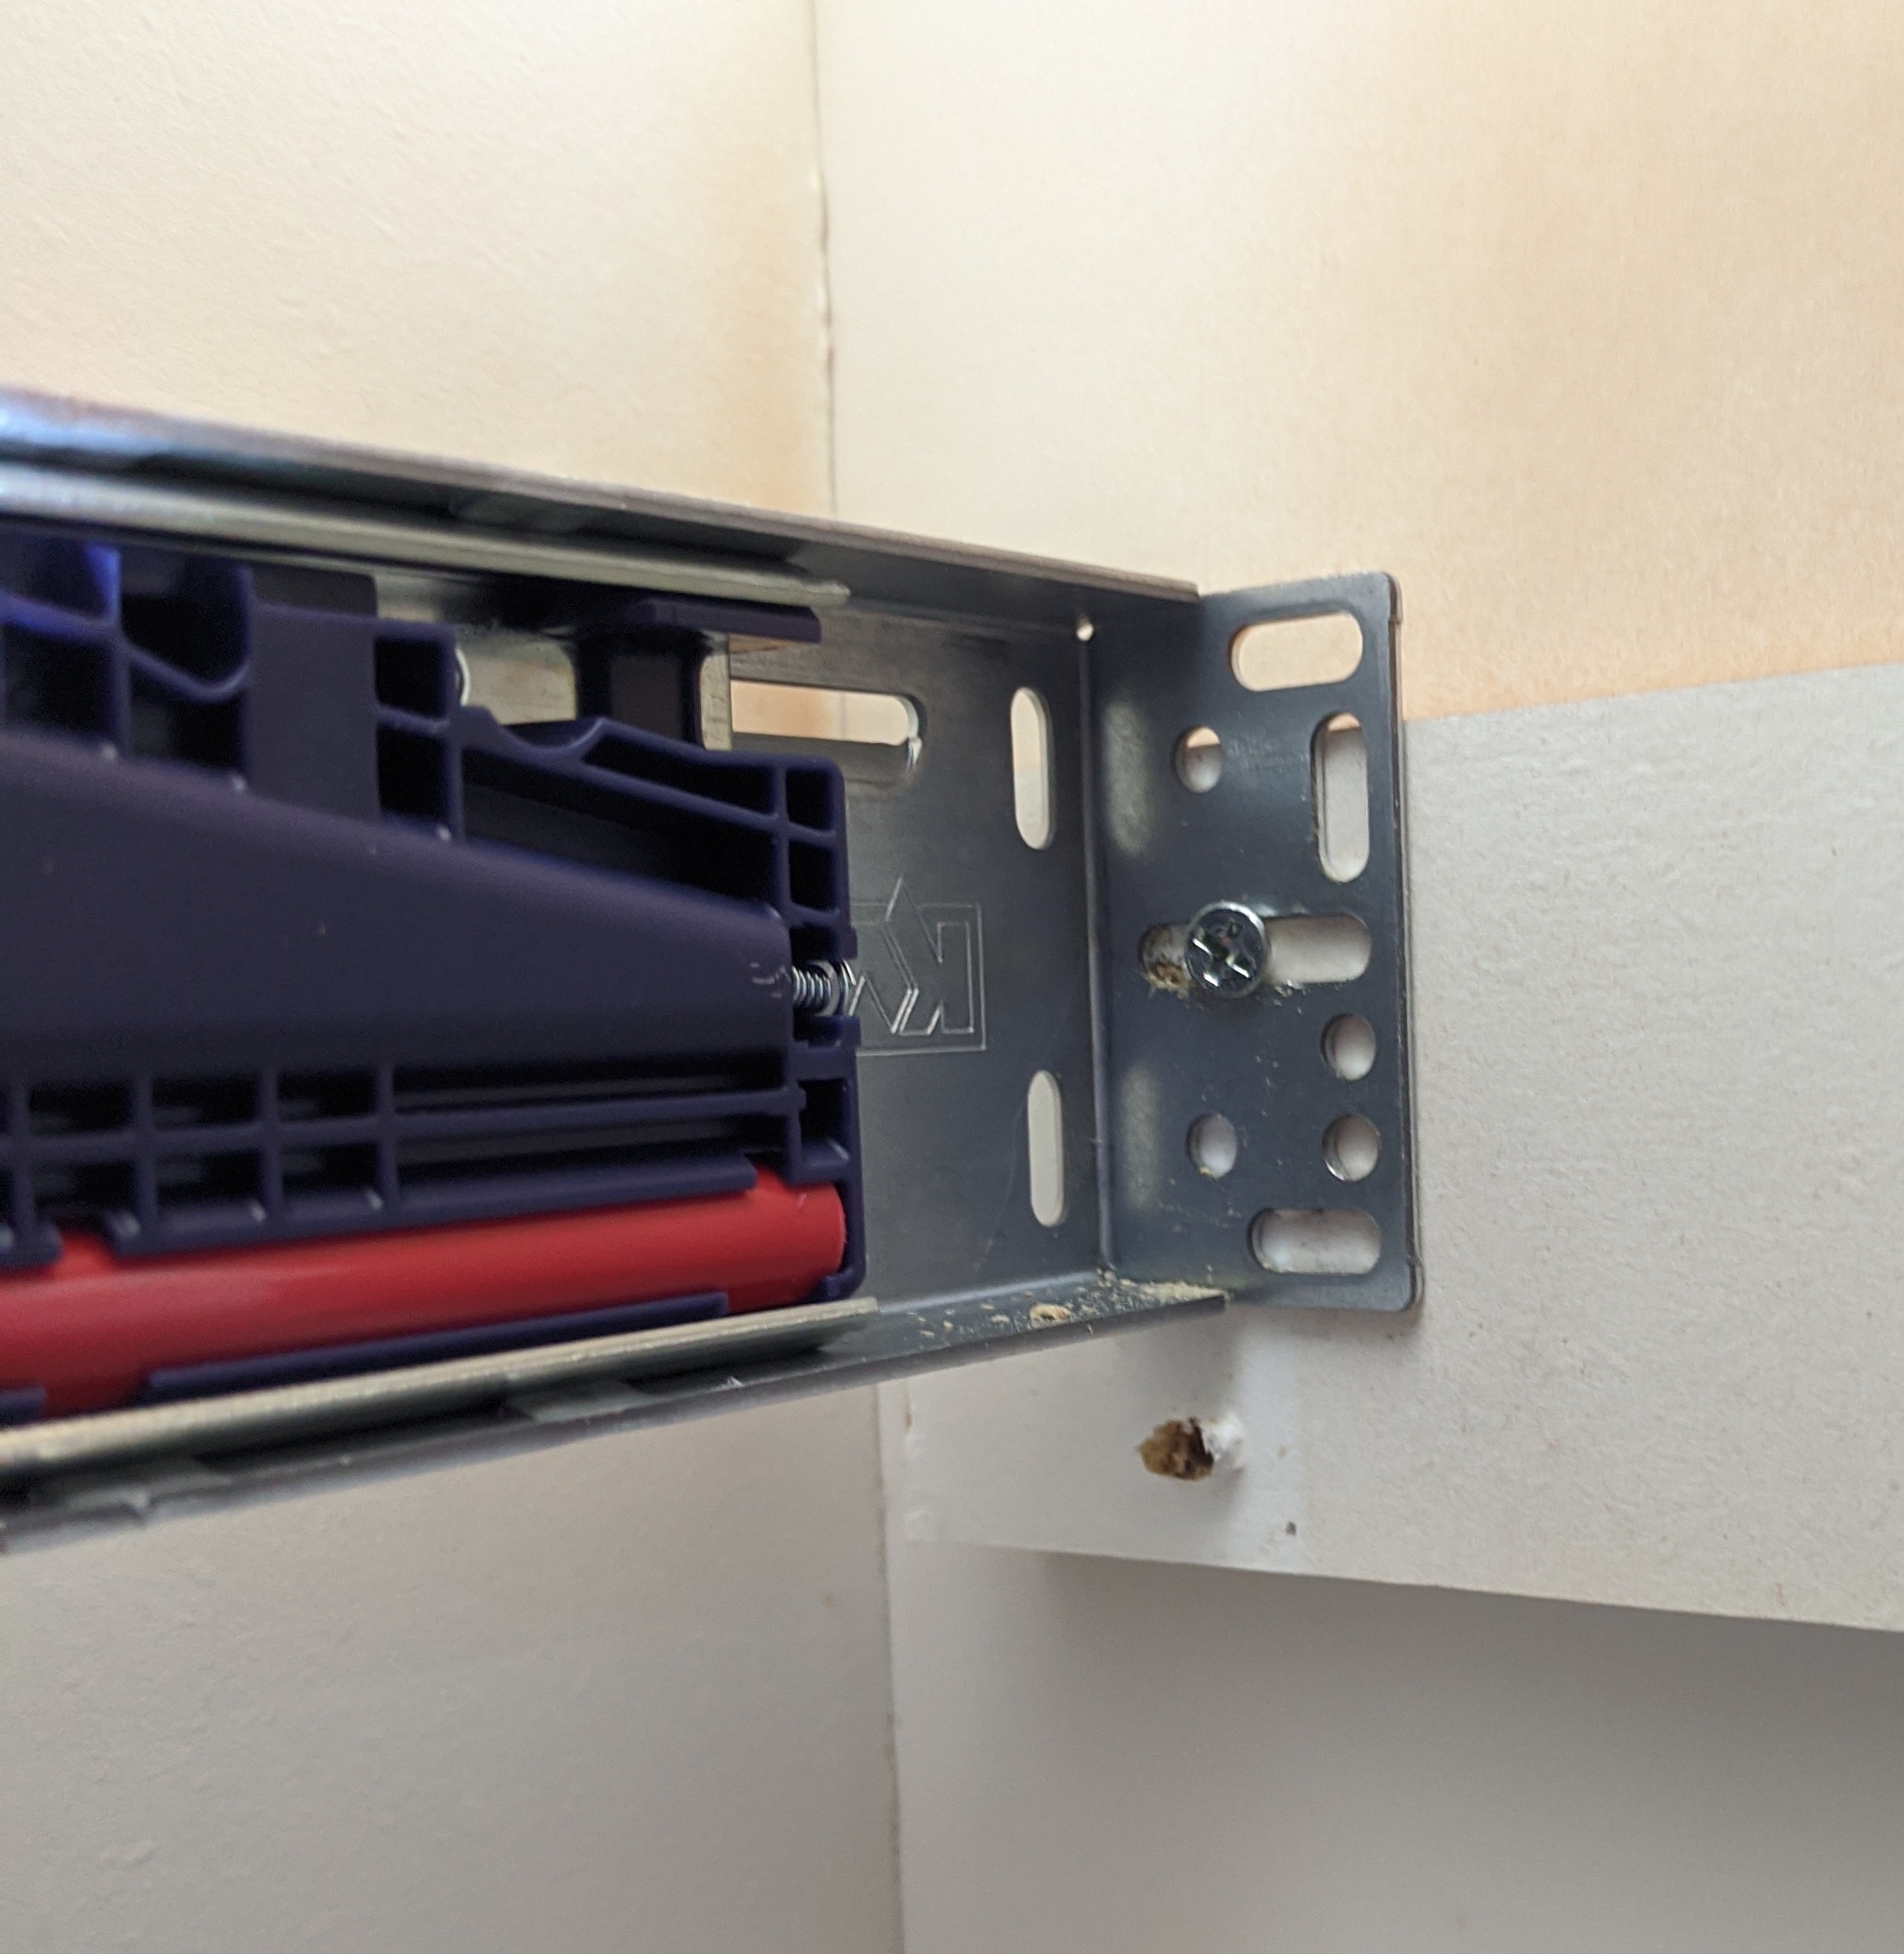
Step 2
Mount the front bracket (pre-drill holes to avoid splitting the wood of your cabinets). My measurements told me my only real choice for where to put the front bracket was resting against the bottom of the opening, because the piece of wood the cabinet builders attached to the back to mount the back bracket against was not tall enough for any other configuration (see the picture in step 3). This also happens to be the easiest method - no measurements needed!
Then, clip in the cabinet side of the drawer slides into the bracket.
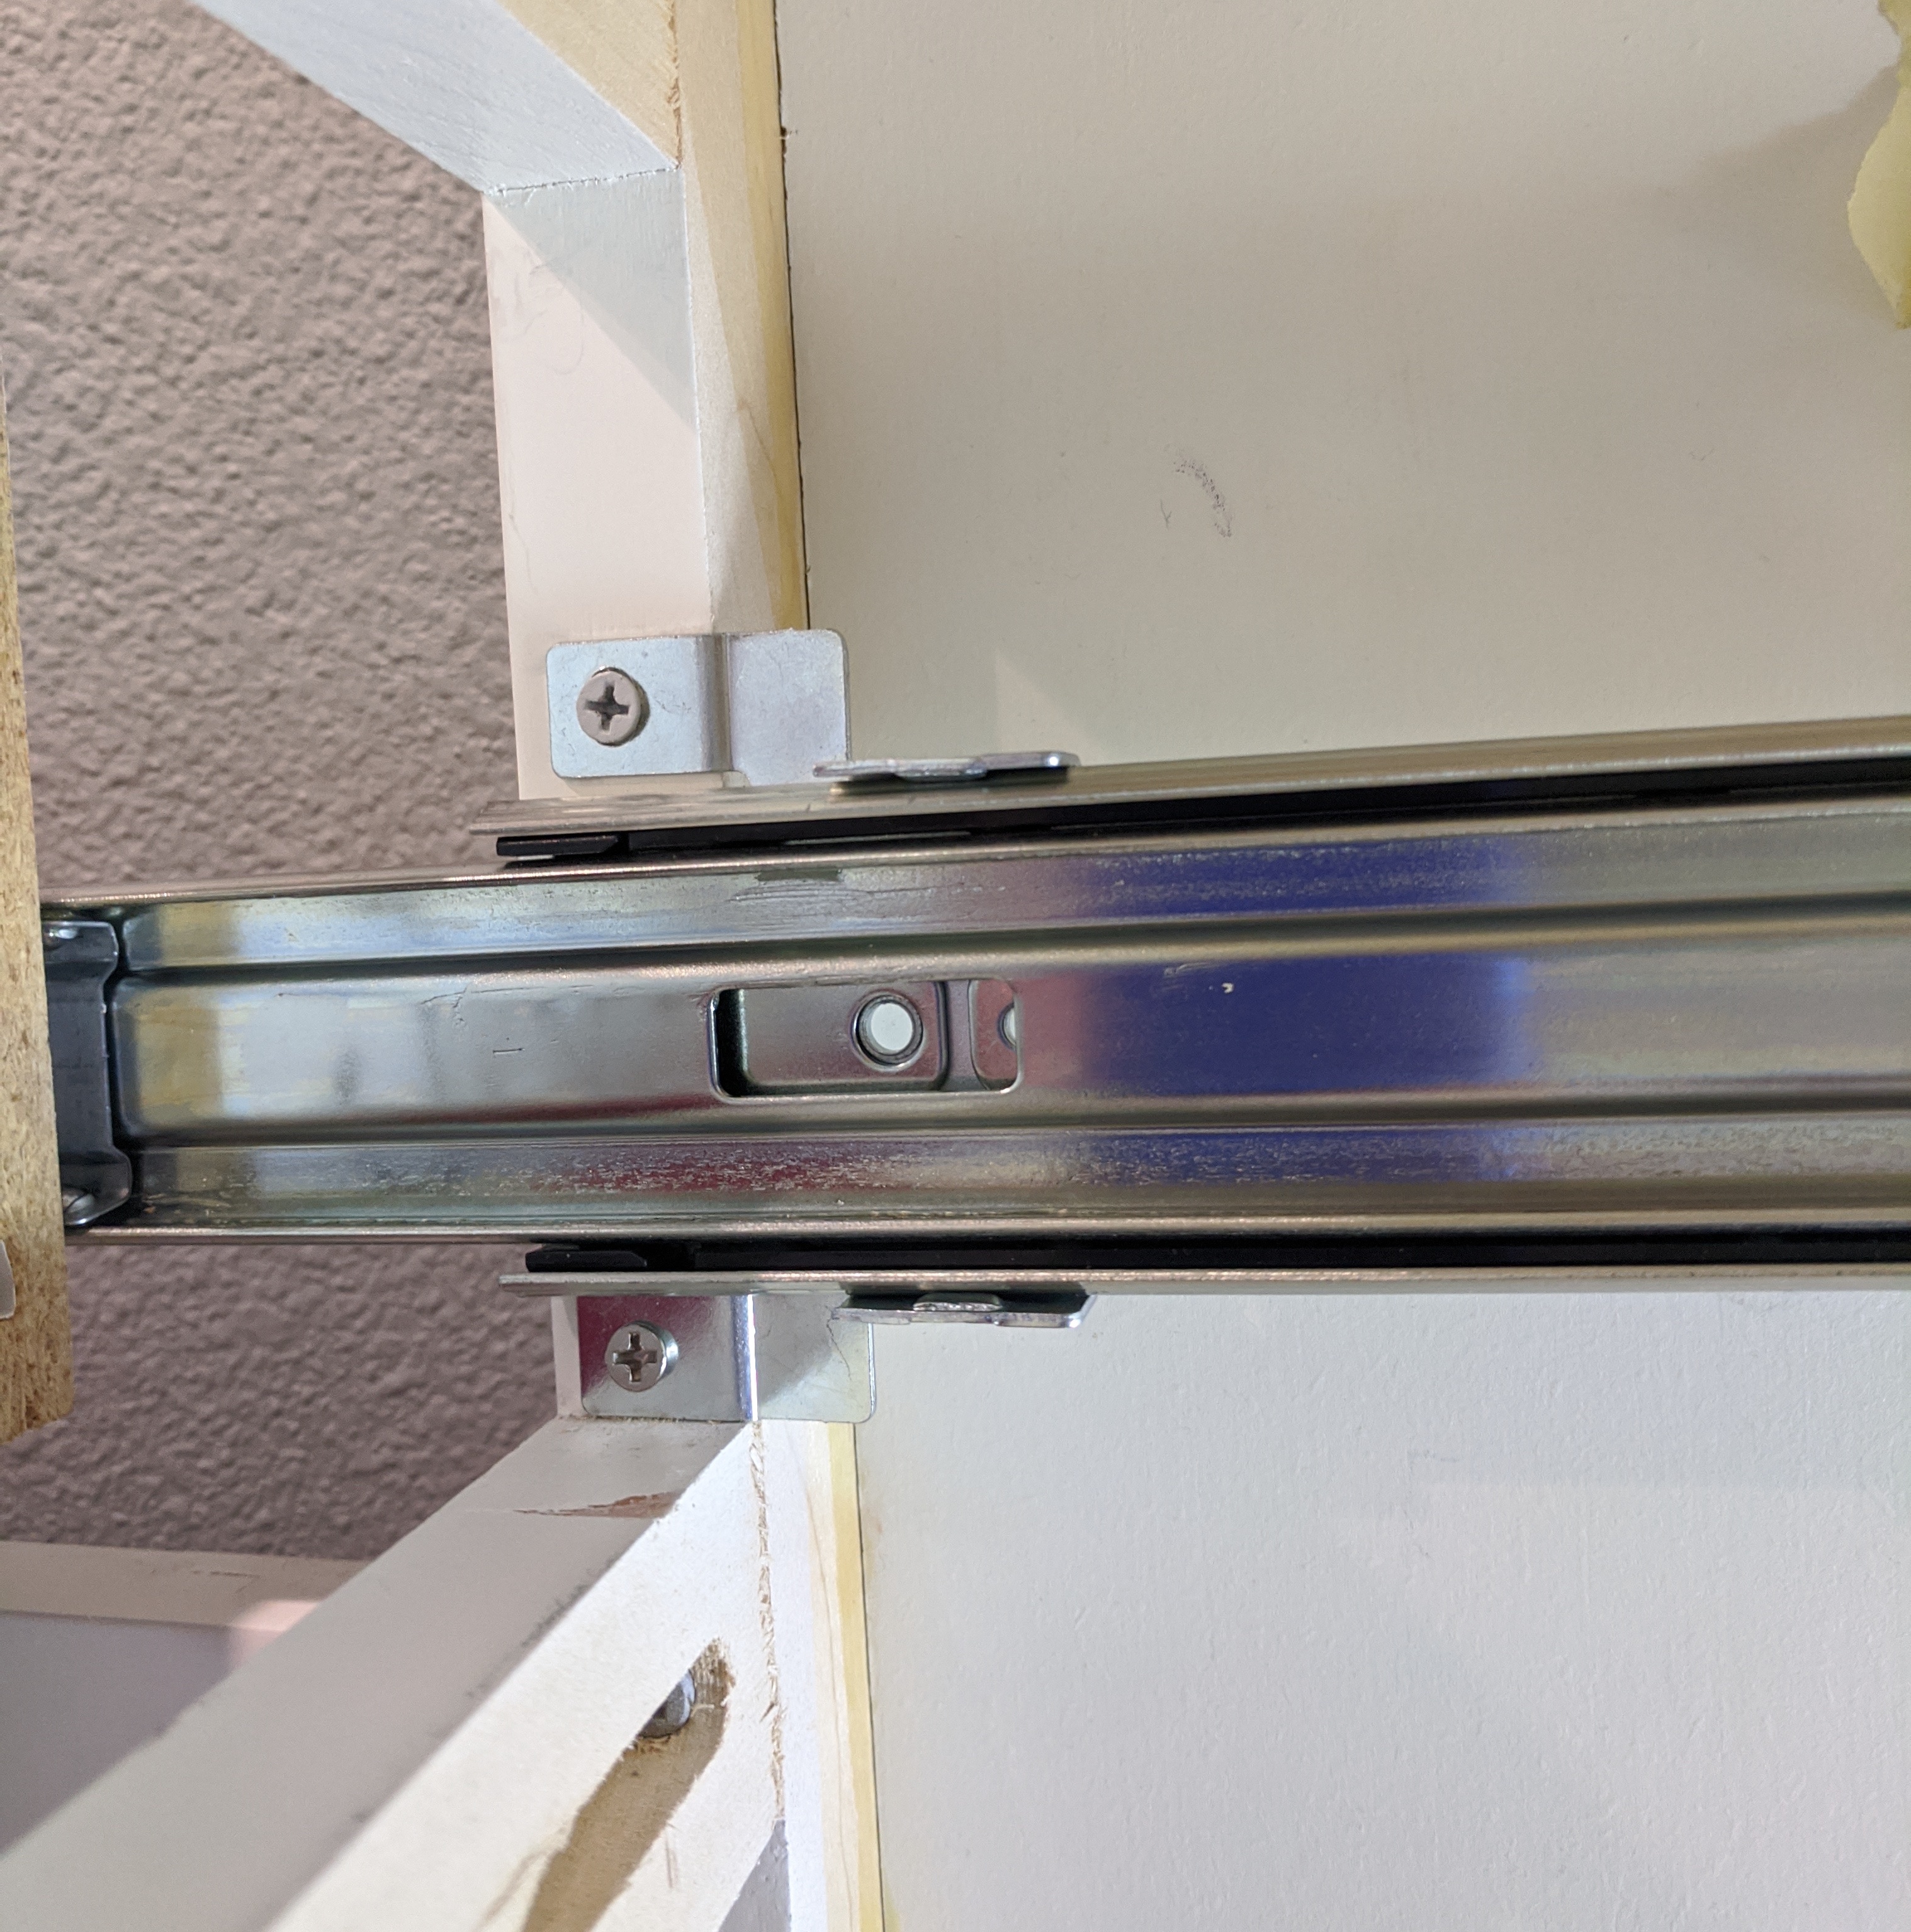
Step 3
Using a level to verify the slide is parallel to the ground, mount the back bracket, ideally using one of the horizontal mounting holes so you can adjust the horizontal positioning of the bracket later.
Try and get as close to the right spot horizontally as possible to avoid having to move the screw. I did this using a rough spacer to try and verify the space between the side wall of the cabinet and the drawer slide was the same in the front and back (I used various spacer objects in each cabinet, since each cabinet was different… e.g. paint sticks, the remaining brackets, my speed square, etc.).
Don’t tighten the screw all the way yet! You’ll want to let the bracket move around when you install the drawer, to let the drawer and the slides find their “happy place” together.
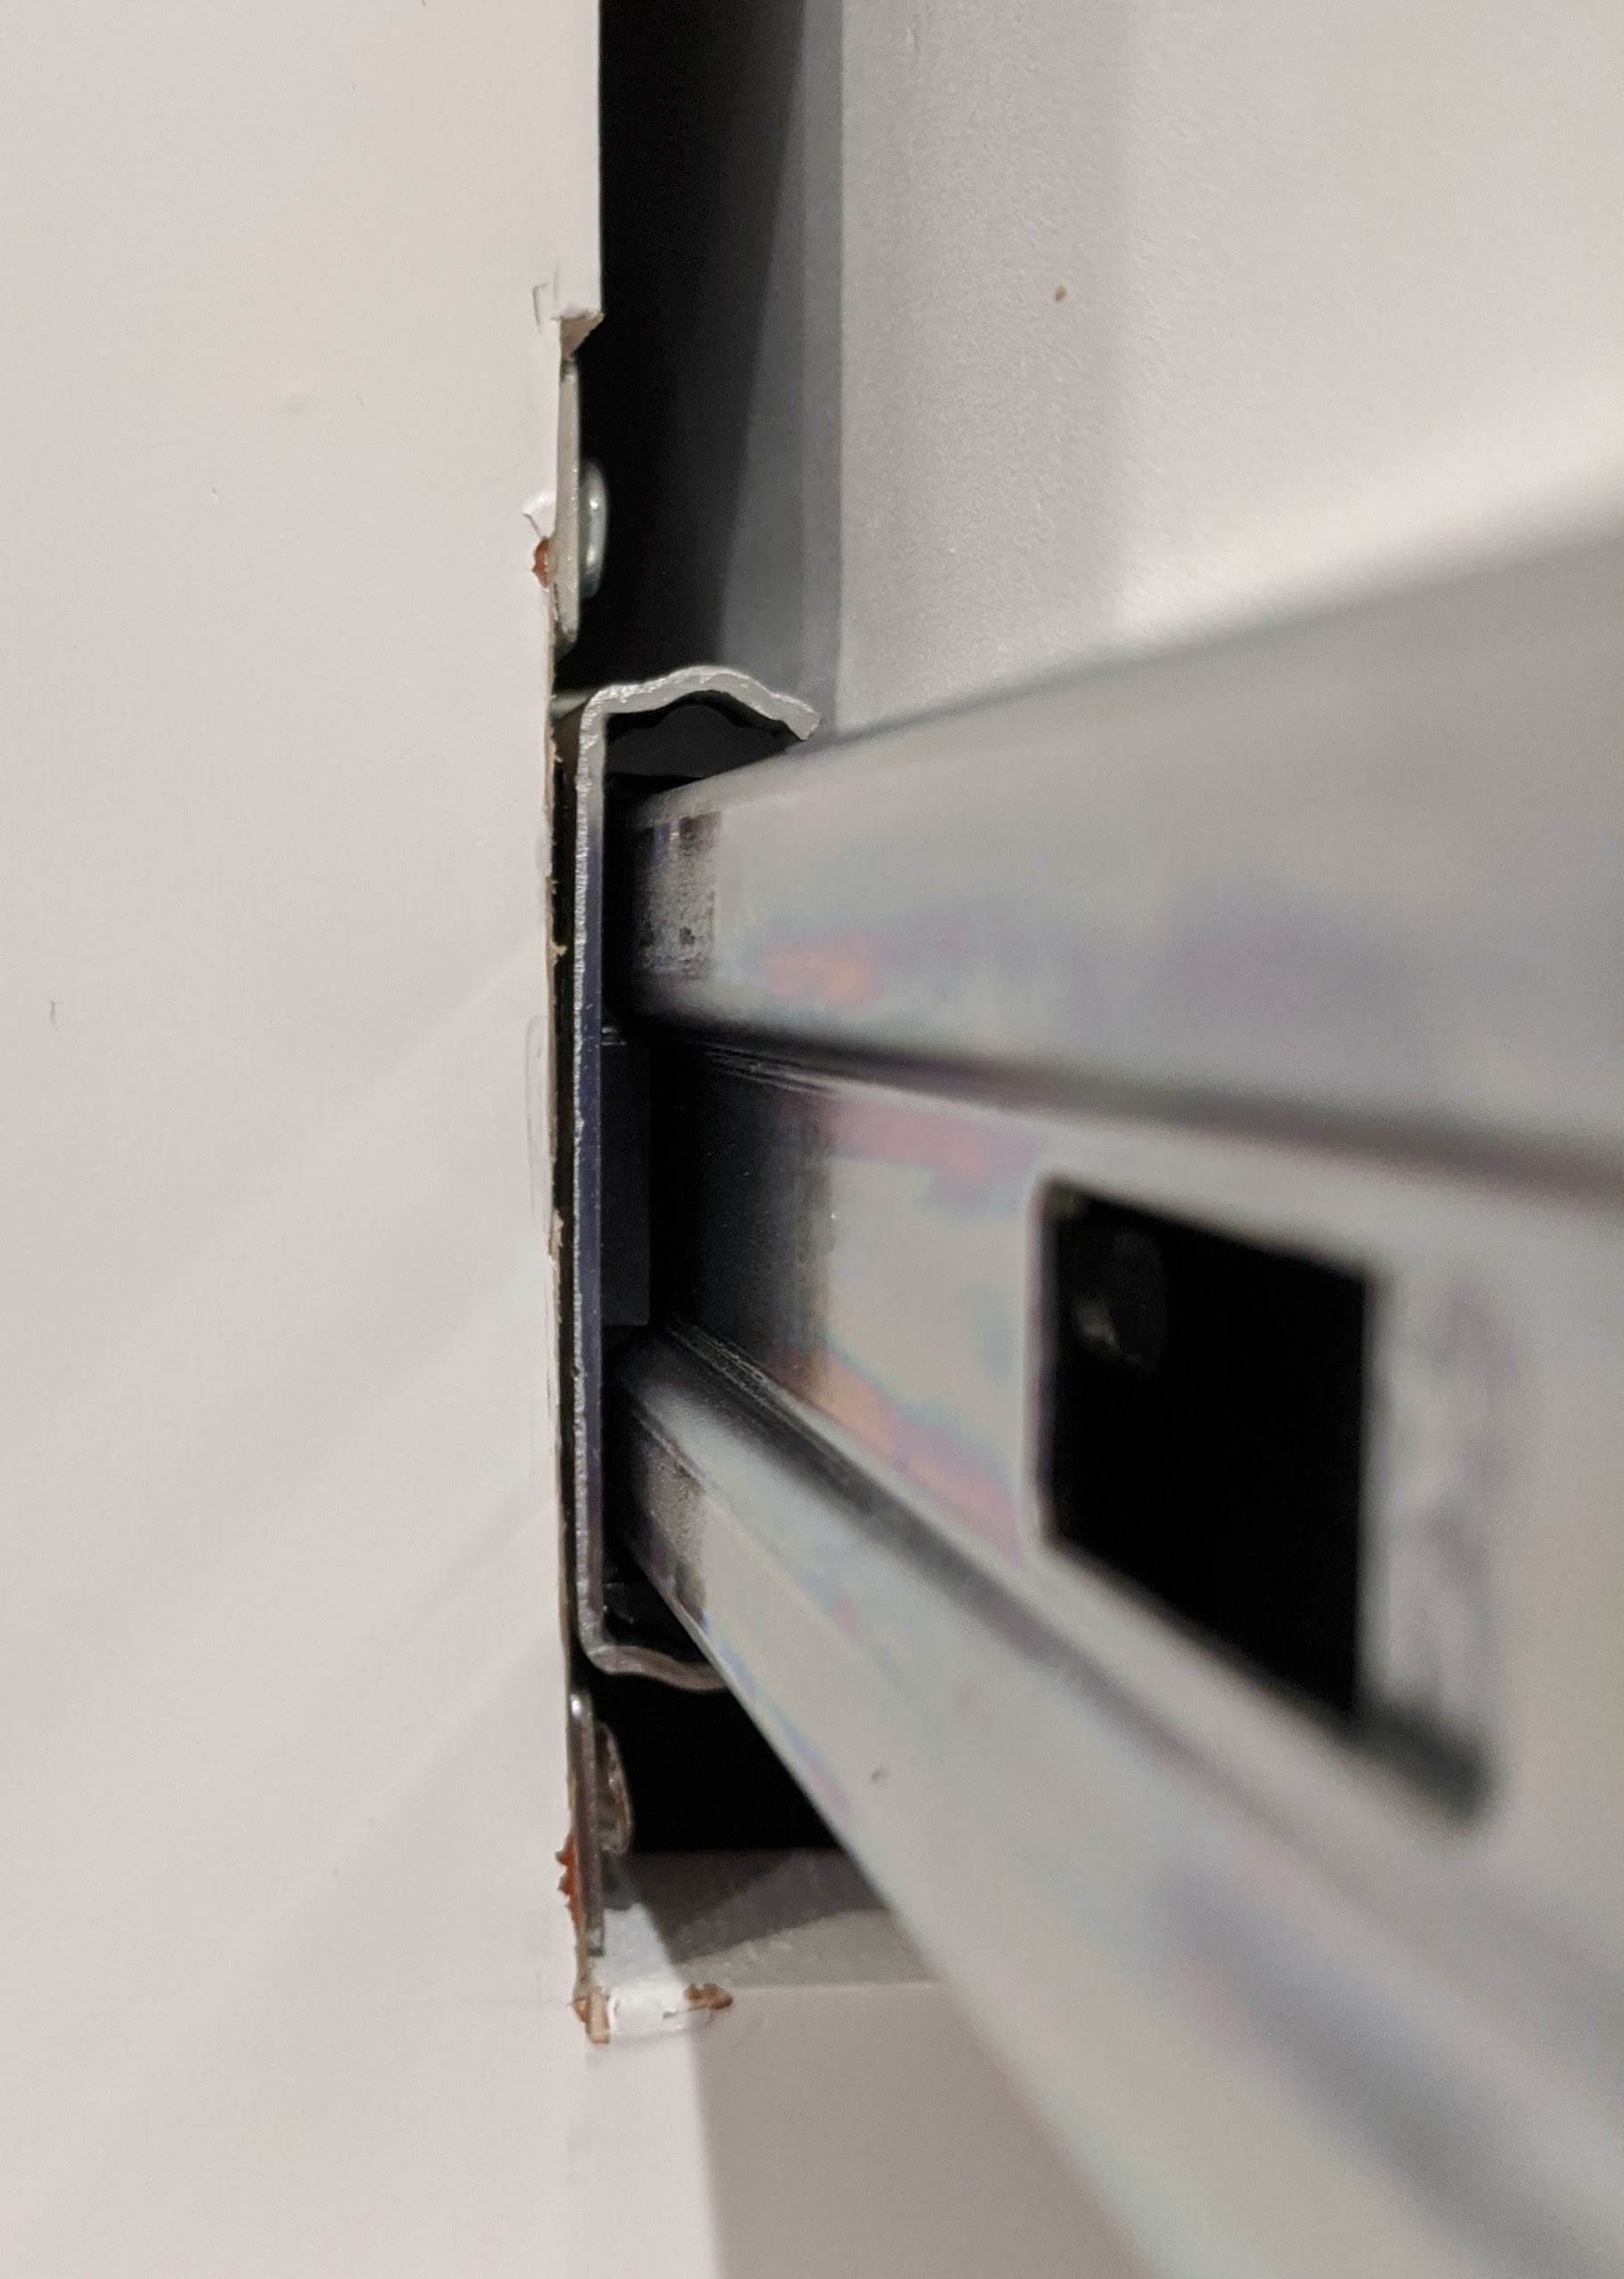
In this picture, you can see what I mentioned earlier about the piece of wood not being tall enough to really comfortably support the use of the front bracket, which lifts the slide (and the back bracket) higher than the original drawer slides were mounted.
I was concerned about this at first, but in the end, all of my back brackets sat about the same as the picture above - about 80% or more of the bracket was supported, and this seemed to work fine. You could always add more wood back there, but I didn’t have any of the right size laying around, and didn’t feel like going to the store mid-project.
Step 4 (ish)
Repeat steps 1-3 for the other side of the drawer.
Step 5
Use a level (or 2) to verify that the two drawer slides are level with one another in several measurements. This means you’ll want to make sure that both rails are level at the back bracket, level at the front bracket (hopefully this is guaranteed by your cabinet’s face frame, but you never know), and also that the back of each rail is level with the front of the other rail.
The big lesson with these drawer slides is that the tolerances for things being out of alignment are very small; any levelling issues you skip now will definitely bite you later. Even the smallest alignment/spacing/level issue can make the drawer get stuck or not move smoothly - more on this later.
Measure twice, cut once, measure & cut again
I did all of the steps above, being as careful as possible to keep everything level and properly aligned.
Then, proud of myself and my math skills, I mounted the rails in the cabinet. Ready to celebrate my success with me?
 Calculated.
…I guess I really should have quadruple-checked my math. It turns out that my 1-7/16" placement of the drawer slide on the cabinet had somehow not counted the 1/2" height the front bracket added to the equation, even though I was sure I had accounted for it. Oops!
That’s better! After removing and re-attaching the drawer-side slides on each side of the drawer, the drawer fit into the cabinet with the 1/4" buffer above and below as desired.

Finishing up
Though the drawer seems to work fine now, we aren’t done yet! We’ve only added one screw to each back bracket, and those aren’t even tightened yet.
If you stick your head under the drawer and watch it as you (or a helper) opens and closes the drawer at various speeds, you’ll probably notice that the back brackets are shifting around on their loose screws at various stages of drawer open-ness. The trick is to observe both brackets as the drawer opens and closes to try and find the right spot to tighten the bracket into. I often found that my drawers seemed happiest if I chose the spot the bracket ended up in when it was close to closing, but each drawer was slightly different.
As you add screws (2 or 3 total screws per back bracket seemed fine to me), be aware of two things:
- Add screws one at a time, opening and closing the drawer a couple times between each screw. You’d be surprised how quickly your drawers will “tell” you they are unhappy with the back bracket’s mounting position.
- Don’t tighten the screws too much! I noticed the bracket would shift/bend a little if I let my screwdriver go wild, which would then make the drawer bind up or otherwise cause some friction with the sliding action.
If you’re lucky…
… then you might have drawers that work great, like these:
Your drawers should glide effortlessly along when extending and retracting. A bit of force is expected when first pulling the drawer open from it’s fully closed position, because there is a spring holding it in place, but, ideally, that should be the only noticable friction. The sound produced by the ball bearings should be consistent throughout the motion of the drawer; a pleasing, smooth roll that whispers your DIY mastery into its surroundings.
Troubleshooting tips
However, I ran into several drawers that just weren’t happy after the first try. Some of them would seem to make a scratching noise at certain stages of the opening/closing range, or just feel “rough.” Others just got stuck in the almost closed position, seemingly refusing to engage with the self-closing mechanism that is supposed to pull the drawer in to its final closed position. One wouldn’t even open at all without extreme force… 😬
Here are a few things I had to do, somewhat in increasing order of difficulty, to get drawers to open/close more smoothly (or at all).
Double (or triple) check the level
When screwing in the back bracket, you might’ve thought you were keeping the level steady, but you weren’t. Try again! As mentioned above, check for level in several positions, and strive for perfection here - it can really make a difference. Remember, it’s a lot easier to bend down and readjust that back bracket now than it will be once you load all of your kitchen tools back into the drawers and their surrounding cabinets!
Check the horizontal screw
If you followed Step 3 above and used a horizontal slot in the back bracket to allow for adjustment, check if the screw is resting against an edge of the slot now. Your back bracket might want to keep moving in that direction to find it’s “happy place”, but it can’t. Reset the screw towards the center of the slot and try opening/closing the drawer a couple times again (making sure to leave the screws on both back brackets loose still, so they can wiggle).
Widen the cabinet opening (yikes)
On a couple of my drawers, there was a lot of friction at certain points of the slide action, and I just couldn’t figure out why. Eventually, after trying everything, like making sure the slides were level, that the drawer-mounted rails were also parallel, that the drawer was built square, etc., I remebered one detail from the instructions that came with the drawer slides.
The instructions mentioned that the cabinet opening for each drawer MUST be between 1" and 1.06" wider than the drawer. I had made sure of this somewhat casually before I even ordered the parts, but I figured I’d double-check, since I was running out of ideas.
Sure enough, I found that the openings in the face frame for some (roughly 1/3) of my drawers were on the shy side of 1" wider than the drawers. By shy, I mean they were more like 15/16ths of an inch wider than the drawer rather than the 17/16ths of an inch the instructions were oddly specific about. When I ordered the parts, I wasn’t measuring carefully enough to notice this, and I had no idea it would matter so much…
Trust me, it matters.
With my utility knife, I proceeded to slightly widen one side of the face frame opening for the first drawer I was having serious issues with. There are probably better tools for this job, but I’m just a simple homeowner, and that’s what I had. I marked a vertical line 1/8" from the existing opening and got to work shaving some wood off. At this point I was desparate, but I was also getting concerned that I was going to destroy the cabinet and still end up with a non-functioning drawer.
However, after shaving off the extra 1/8" and re-mounting the face frame bracket, I was shocked to find the drawer, with no other adjustments, was opening and closing 💯 times smoother than before!
 A little cut went a long way!
As I mentioned, I had to do this to several of my cabinets - by the end of the project, I wasn’t even trying to install the drawer slides the first time without widening the opening if it seemed shy of an inch wider than the drawer.
It’s not the prettiest solution - I’d obviously prefer that my face frames had been made more precisely. And I did end up chipping a little bit of paint off here and there with my utility knife.
But, it seems like the tolerances for these new, soft-close drawer slides (with their small ball bearings) are much smaller than the tolerances for the cheap builder-grade slides the house came with (go figure - the builders were lazy?!), so I didn’t have much choice. The good news is, the face plate of my drawers hides this implementation detail from kitchen-visitors, and even when the drawer is open you can hardly tell without bending down and staring at the face frame.
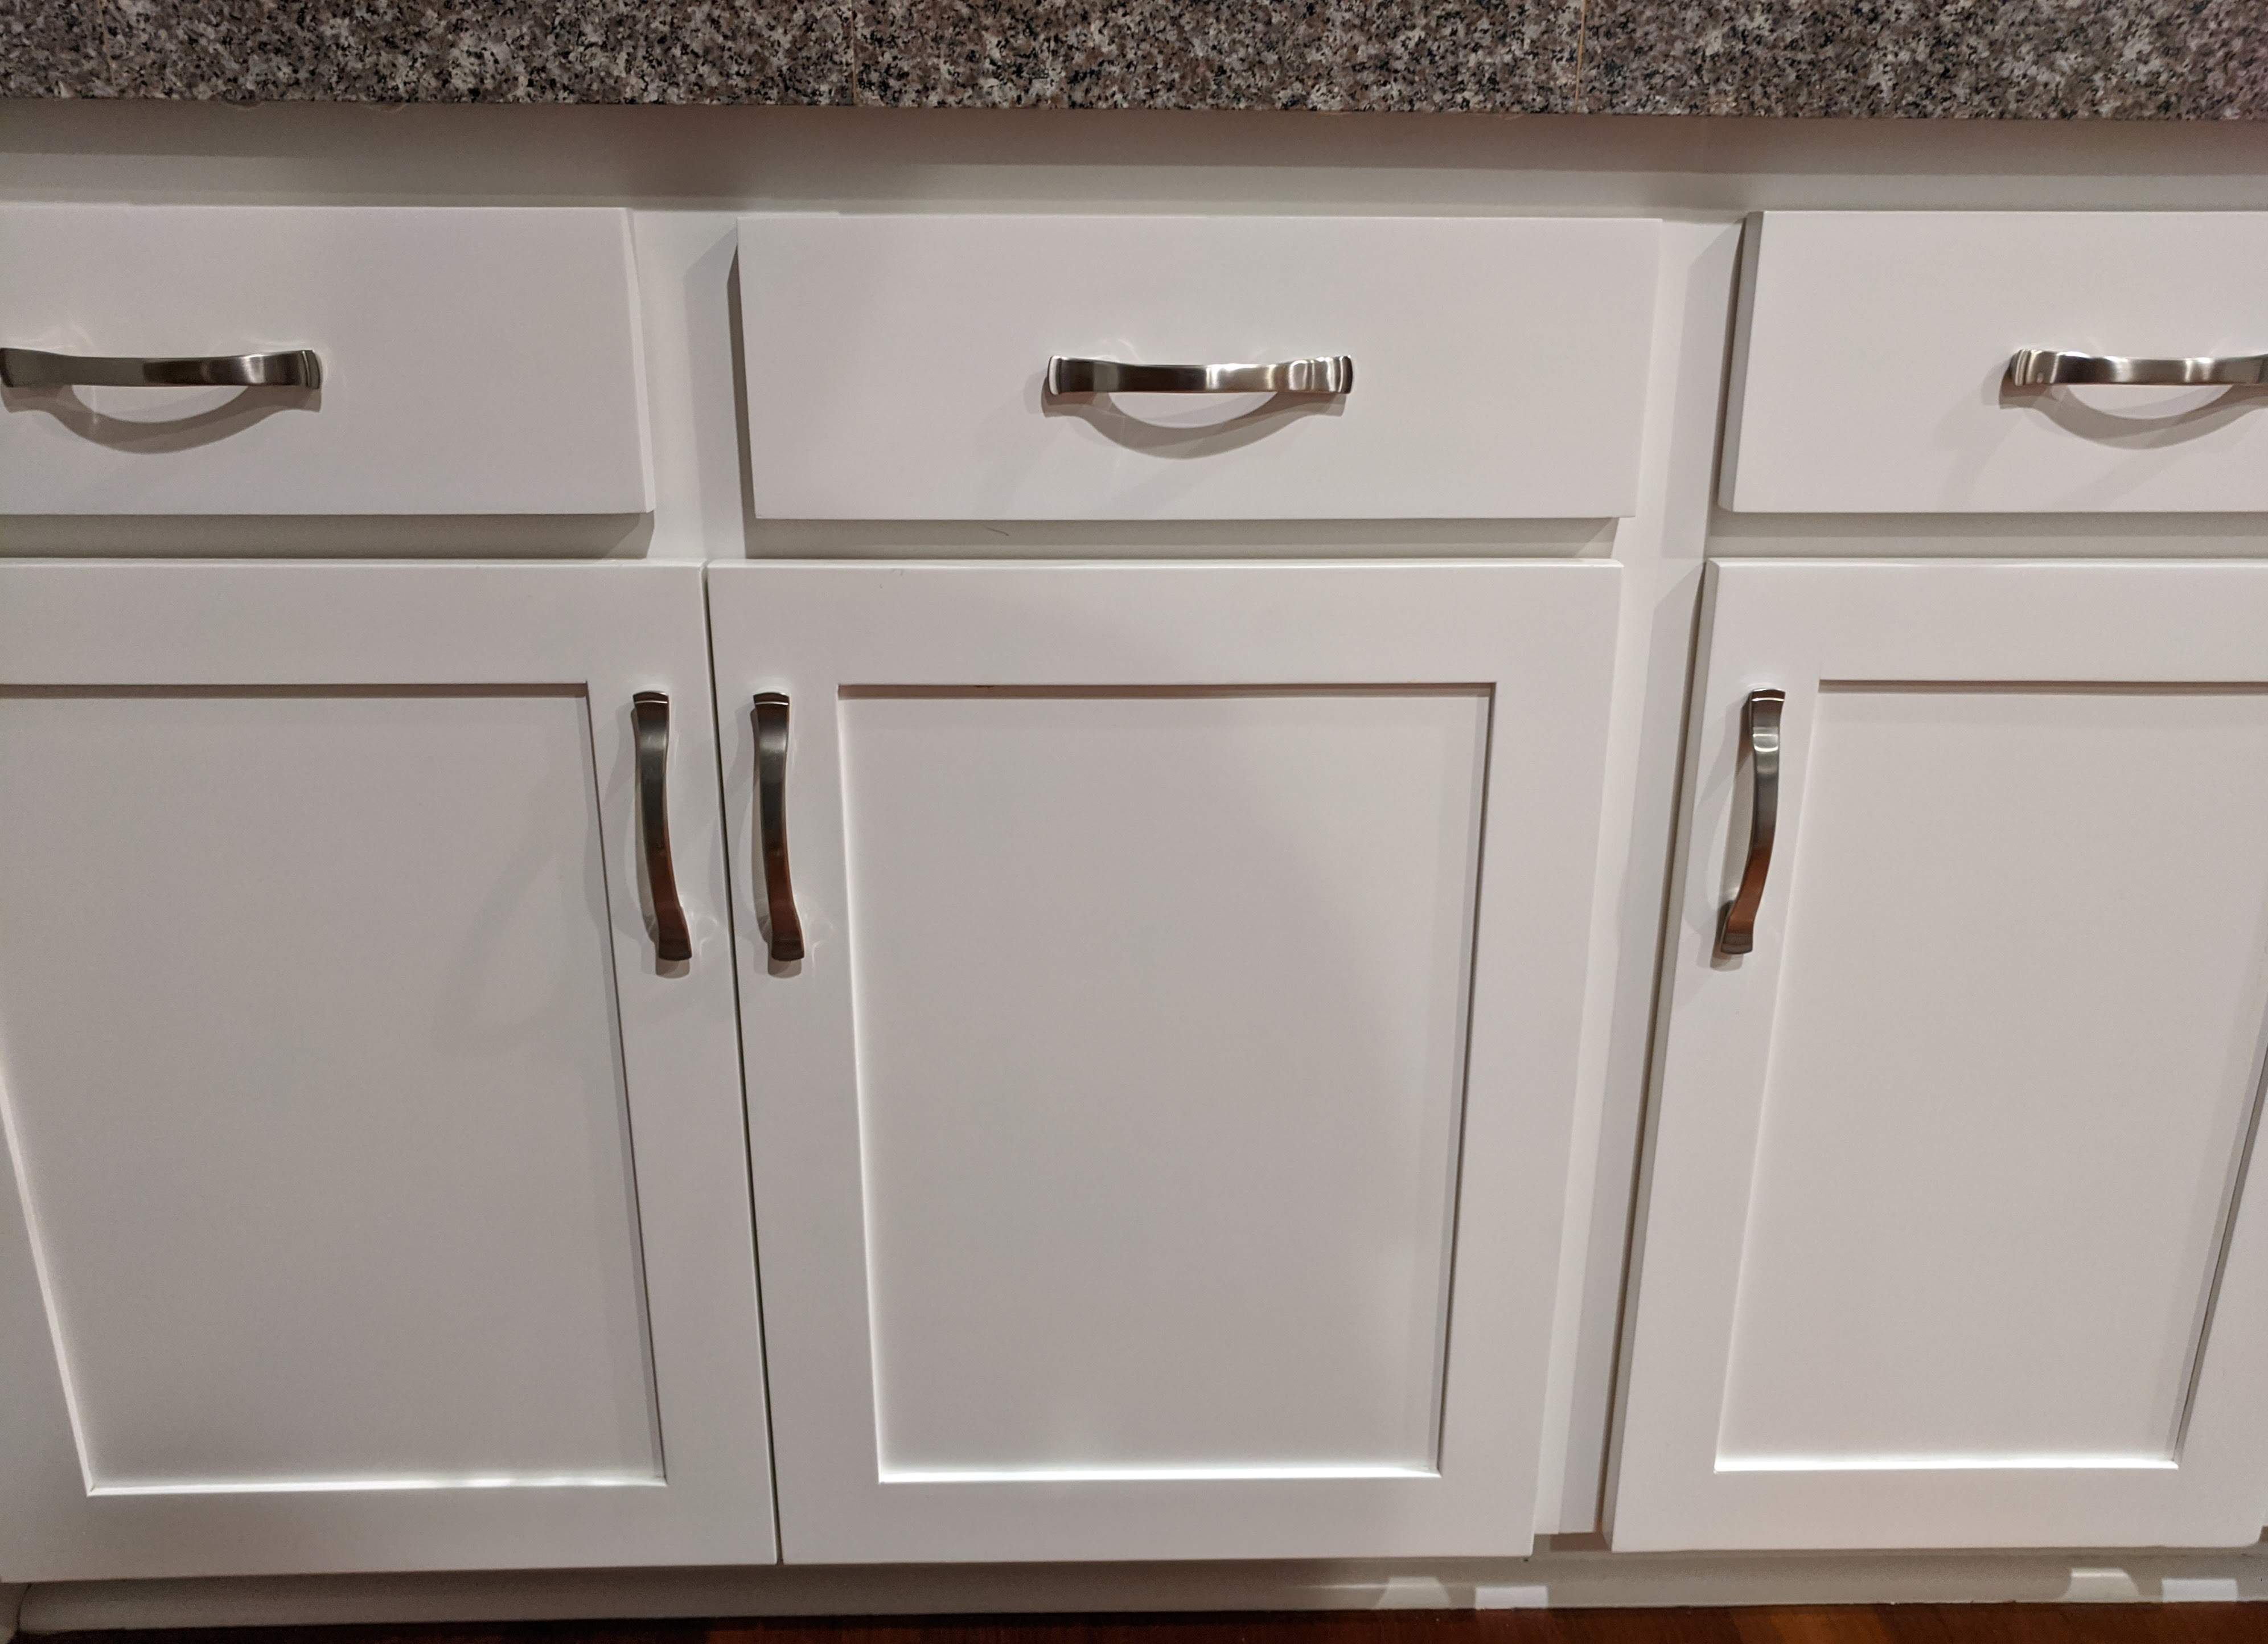 Don’t you dare start inspecting my drawers
It’d be even better if I patched up the chipped paint on some of them, but I don’t have the exact white to match. I’ll employ my wife’s favorite saying to use when things aren’t perfect: “It’s rustic!”
Final thoughts
Overall, this project wasn’t so bad. I did wait 6 months to finish it because it was a pain a the beginning, truthfully… but by the end I was rolling through this project, doing each drawer in about 20 minutes or less. It just took some time to work out a good strategy and workflow, and some patience when drawers just didn’t want to cooperate.
Things would have been easier if any or all of the following were true:
- The drawers were made square
- The cabinets were made square
- The face frame openings were consistently the right size
- The countertop wasn’t installed yet
- I knew what I was doing before starting the project
However, I got through it! My wife loves the results (I think), and a nice side effect is that we can use the whole drawer now, rather than just 80% or so, because, unlike the old slides, these drawer slides let the drawer extend all the way out of my cabinet:
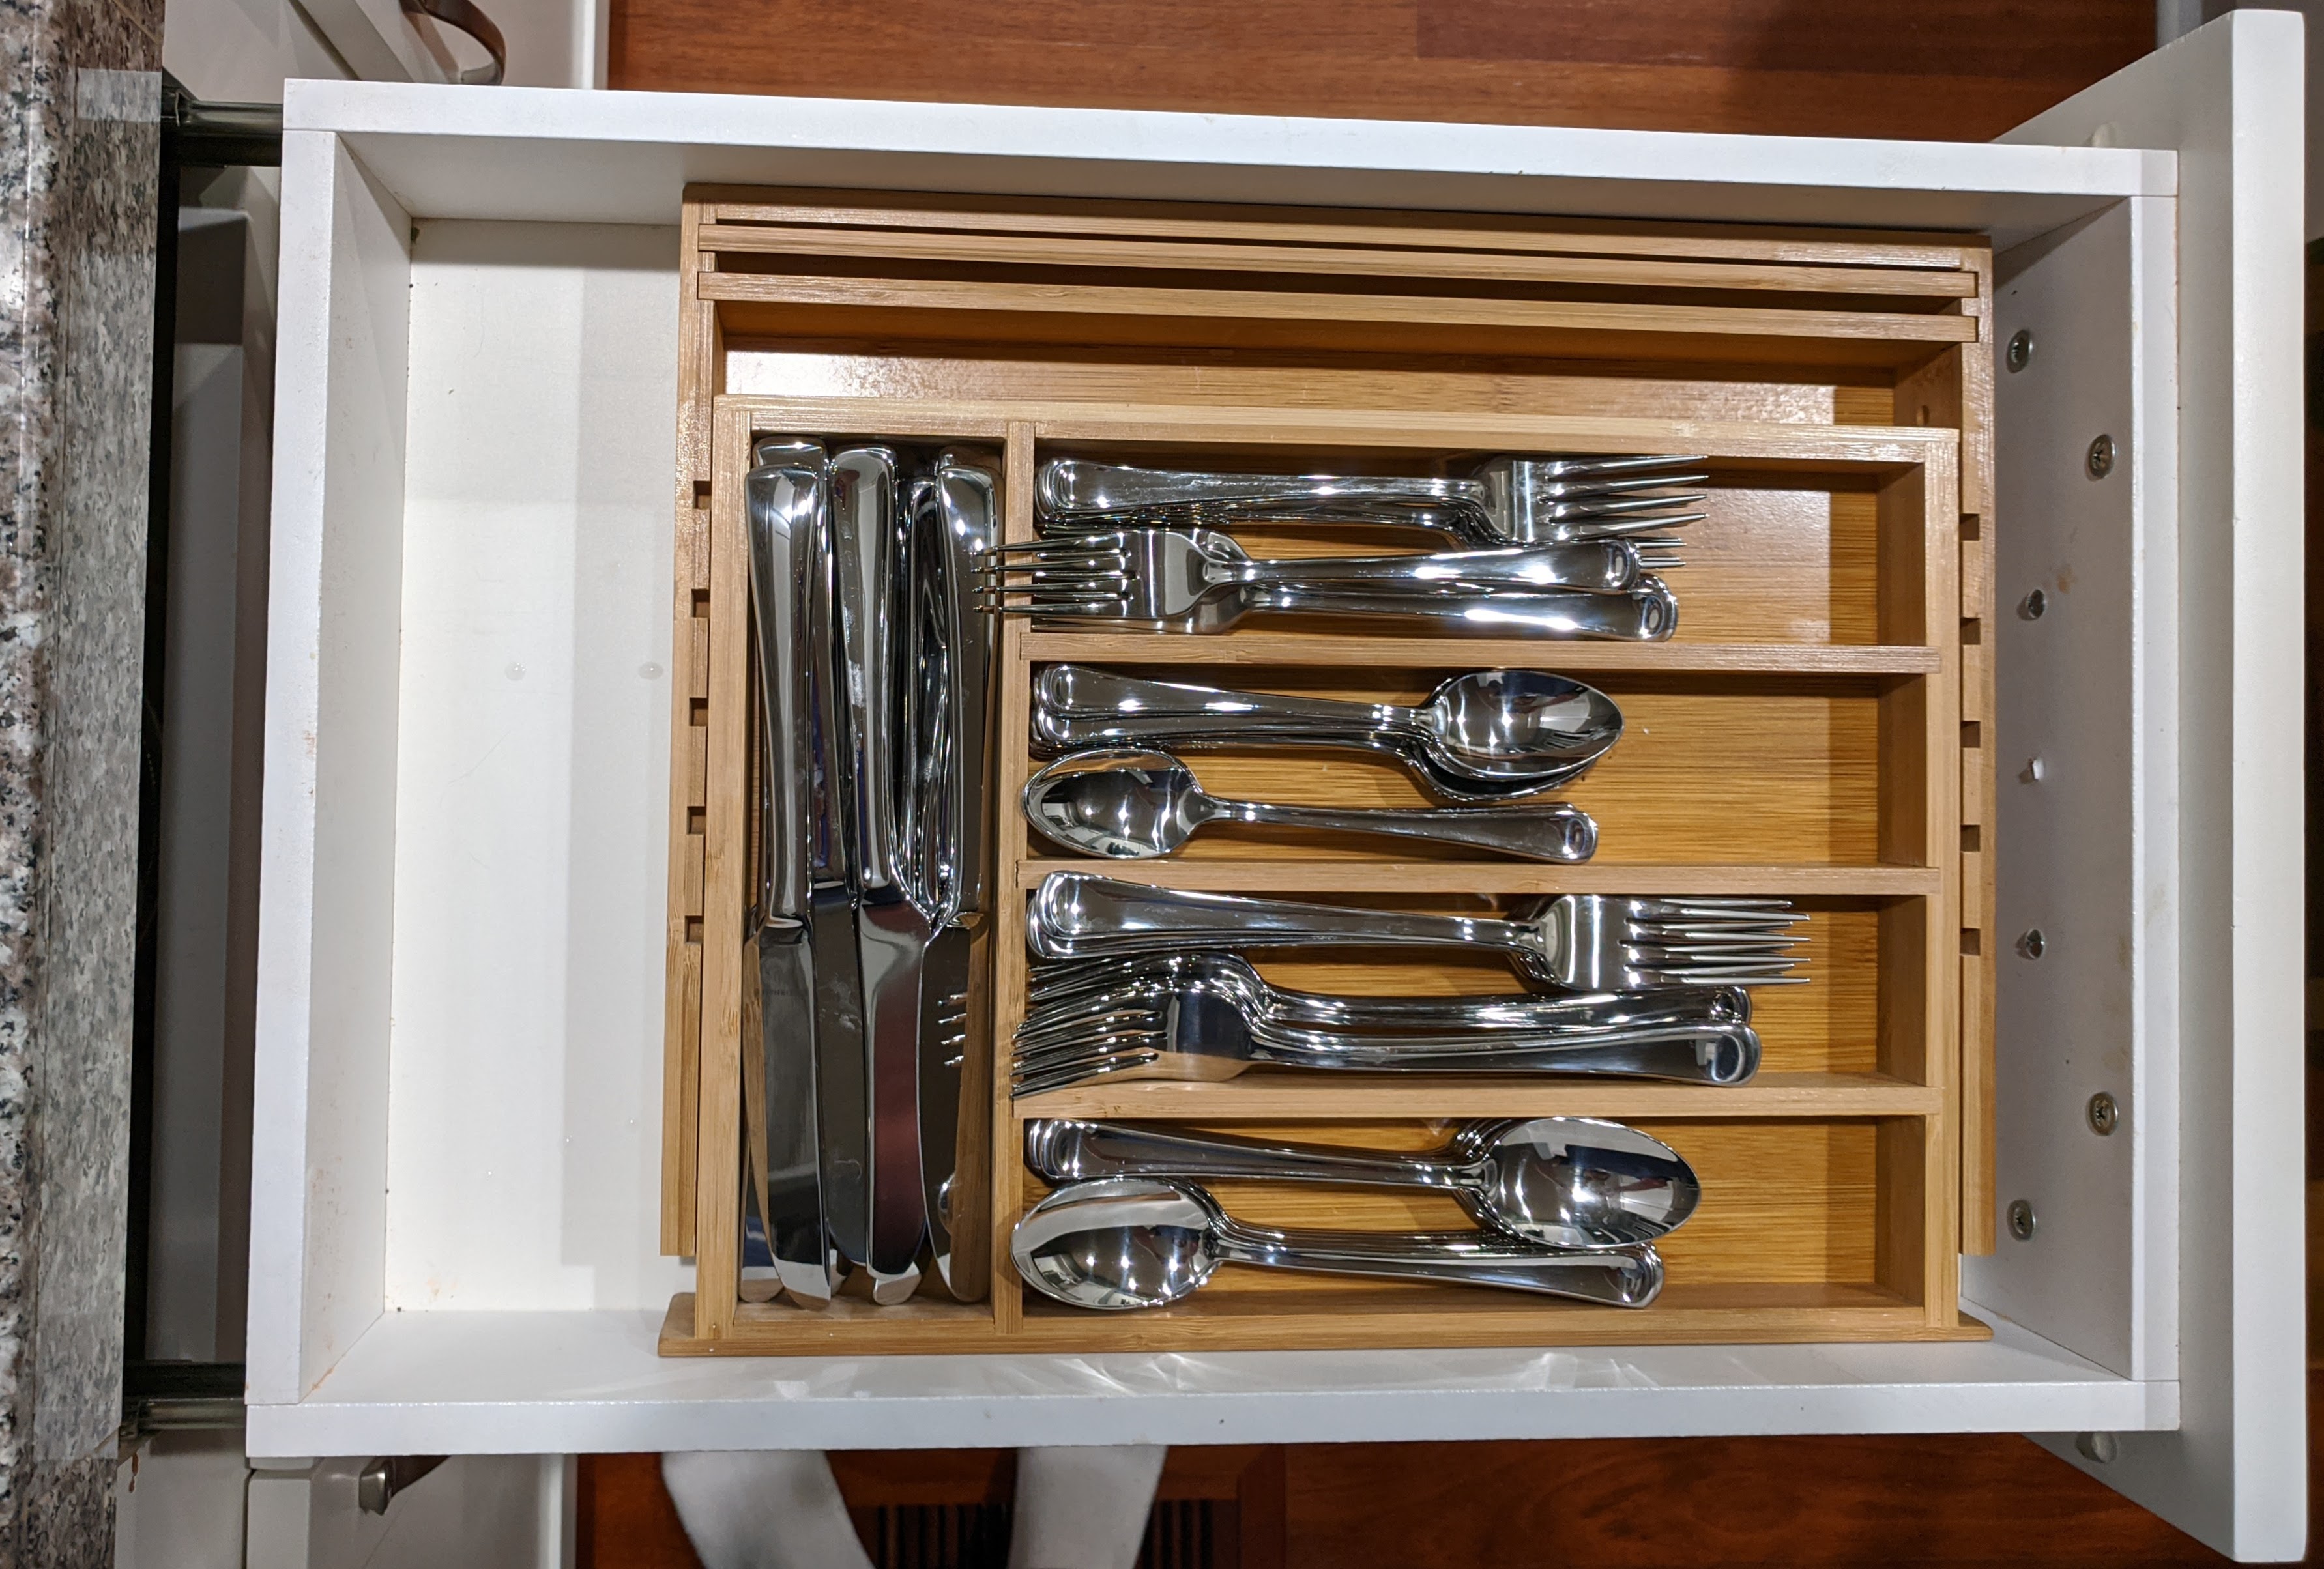 So much space for activities!
I also forgot to mention that I actually had 13 drawers, but only ordered 11 slides. This was just a mistake - I forgot to count the drawers on the island - but it worked out in the end: I actually didn’t want to do the hard work to install the drawer slides on the bottom 2 drawers in the thin vertical stack-of-4 because it was going to be difficult to reach into the cabinet to install them. We don’t even use the bottom one, so 🤷♂️. Maybe later.
I’ve often found myself standing in the kitchen, mindlessly opening and closing drawers, just enjoying the fruits of my labor. That feeling alone makes it all worth it… 🔨